10 Genius Spring Craft Ideas Using Paper Napkins (That Look Expensive!)
This post may contain affiliate links · This blog generates income via ads
Spring is in the air, and if you’re like me, you’re itching to refresh your home with some seasonal decor. But let’s be honest: Spring decorations can get expensive fast! That’s why I’m so excited to share these 10 genius Spring craft ideas using an unexpected material: paper napkins.
Yes, those pretty paper napkins you can find at Dollar Tree, Dollarama, or Amazon for less than $3 a pack can be transformed into stunning decor pieces that look like they came from high-end boutiques. These projects are perfect inspiration for anyone looking for budget-friendly Spring craft ideas that deliver impressive results. (And they also make great gifts!)

Why Paper Napkins Make Perfect Spring Craft Supplies
Paper napkins are an ideal crafting material because:
- They’re incredibly inexpensive
- They come in beautiful seasonal patterns and colors
- They’re lightweight and easy to work with
- They can be separated into thin layers for decoupage
- Most importantly, they create gorgeous results!
Let me share these 10 easy Spring crafts using simple supplies that will transform your home without breaking the bank!

1. Gorgeous Napkin Candles
One of my absolute favorite spring craft ideas is creating custom pillar candles using paper napkins and an iron. The heat from the iron melts just enough of the candle surface to embed beautiful napkin designs into the wax. This is such a fun Spring project, and it would be great to do with a friend!
Materials needed:
- Plain white pillar candles
- Decorative napkins
- Parchment paper
- Iron on low setting
- Scissors
Simply position your napkins on the candle, cover with parchment paper, and gently apply heat with the iron. The napkin design becomes part of the candle, creating a beautiful piece that looks hand-painted. Trim any excess napkin off when you’re done. These candles make stunning centerpieces for spring gatherings and would easily cost $25-30 each in stores!
Pro tip: These are primarily decorative as the napkin design will burn if the candle is lit all the way down. You can use faux candles made with real wax for a safe alternative!

2. Teacup Napkin Bow Arrangements
This elegant spring craft idea elevates a simple place setting into something that looks professionally styled.
Materials needed:
- A teacup (thrift stores are perfect for finding these!)
- Pretty paper napkins
I’ll teach you a special napkin folding technique to create a perfect bow, which is then positioned in the teacup to create an elegant presentation. These are perfect for Mother’s Day brunch, Easter dinner, or any spring gathering, costing less than a dollar per setting.
Open up a square paper napkin, then fold it in half to make a triangular shape. Fold the point to the center, then fold it again to create a long rectangle with pointed ends. Fold each end across the center, then pinch in the middle to create a bow shape. Thread the bow through the handle of your teacup… and voila! You can see the video version of this technique here.
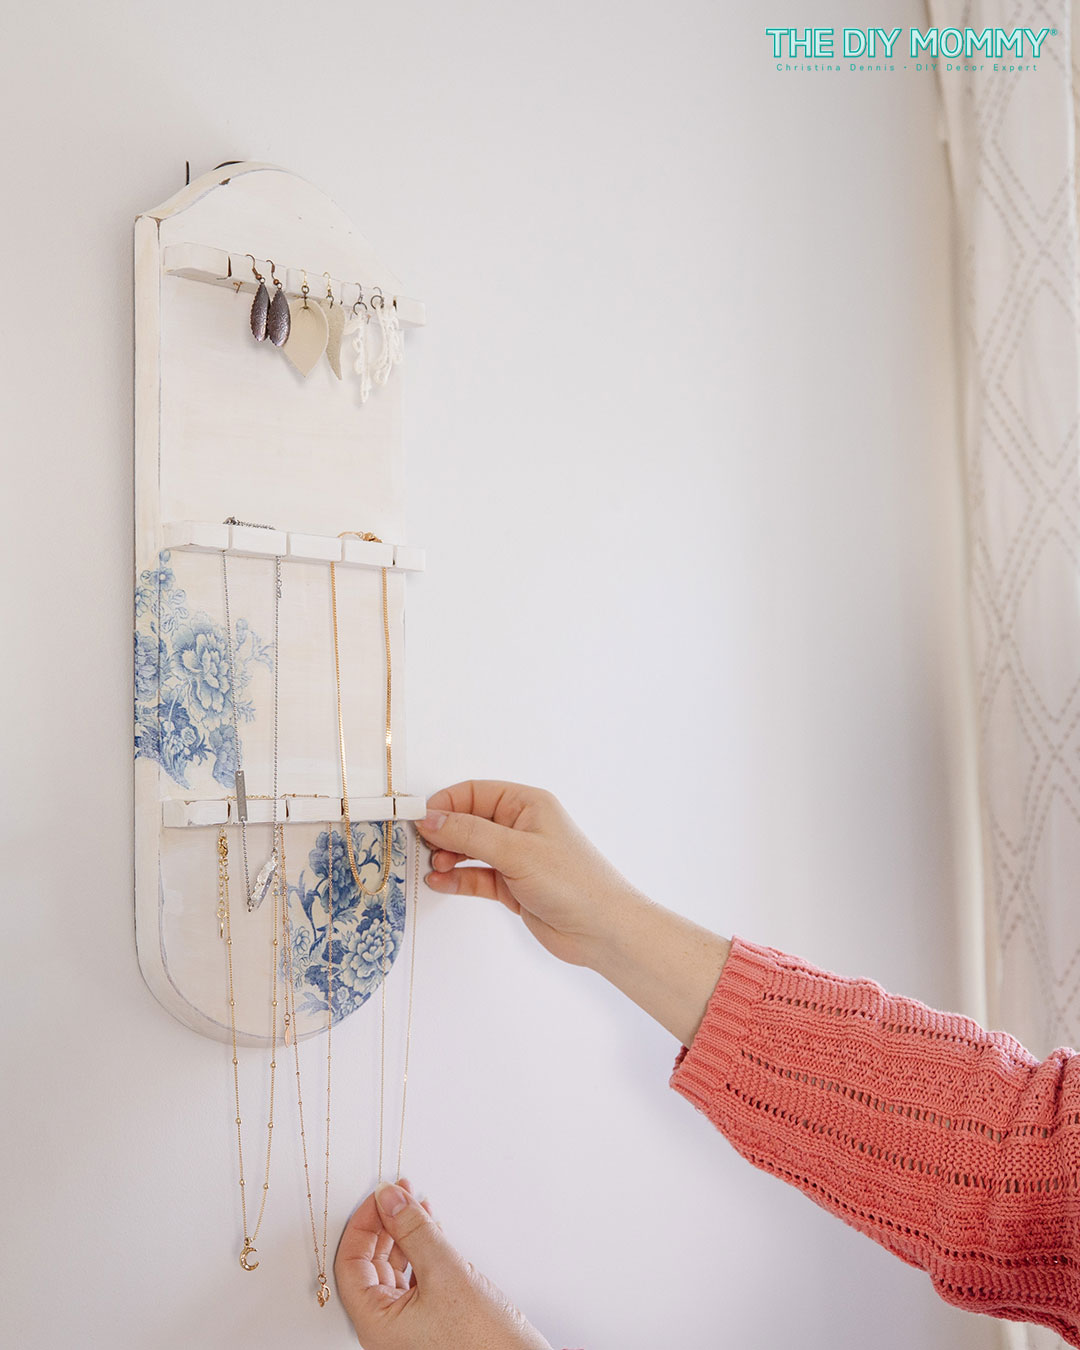
3. Upcycled Spoon Rack Jewelry Holder
This spring craft transforms an old spoon rack into a gorgeous jewelry holder using napkins and Mod Podge.
Materials needed:
- A wooden spoon rack (or any small shelf)
- Decorative paper napkins
- Paint
- Mod Podge
- Paintbrush
- Drill and small bit
After cleaning your spoon rack, paint it with white (or any colour) chalk paint. Apply your favorite napkin motifs using decoupage, then drill small holes in the top bracket to store earrings. The result is a custom jewelry organizer that looks boutique-bought but costs less than $10 to make. Find the full tutorial for this DIY jewelry holder from a spoon rack here.

4. Framed Napkin Artwork
This might be the easiest Spring craft idea on the list, but the results are absolutely stunning.
Materials needed:
- Dollar store frames (any size works!)
- Spring-themed napkins
- Scissors
- Optional: coordinating scrapbook paper for backing
Cut the napkin to fit your frame, place it inside, and voila! You have custom artwork that perfectly matches your spring decor. Create a gallery wall of different napkin designs or use matching ones for a cohesive look. I styled my art on my mantel with some pretty faux florals for a fun way to bring a little Spring into my living room.
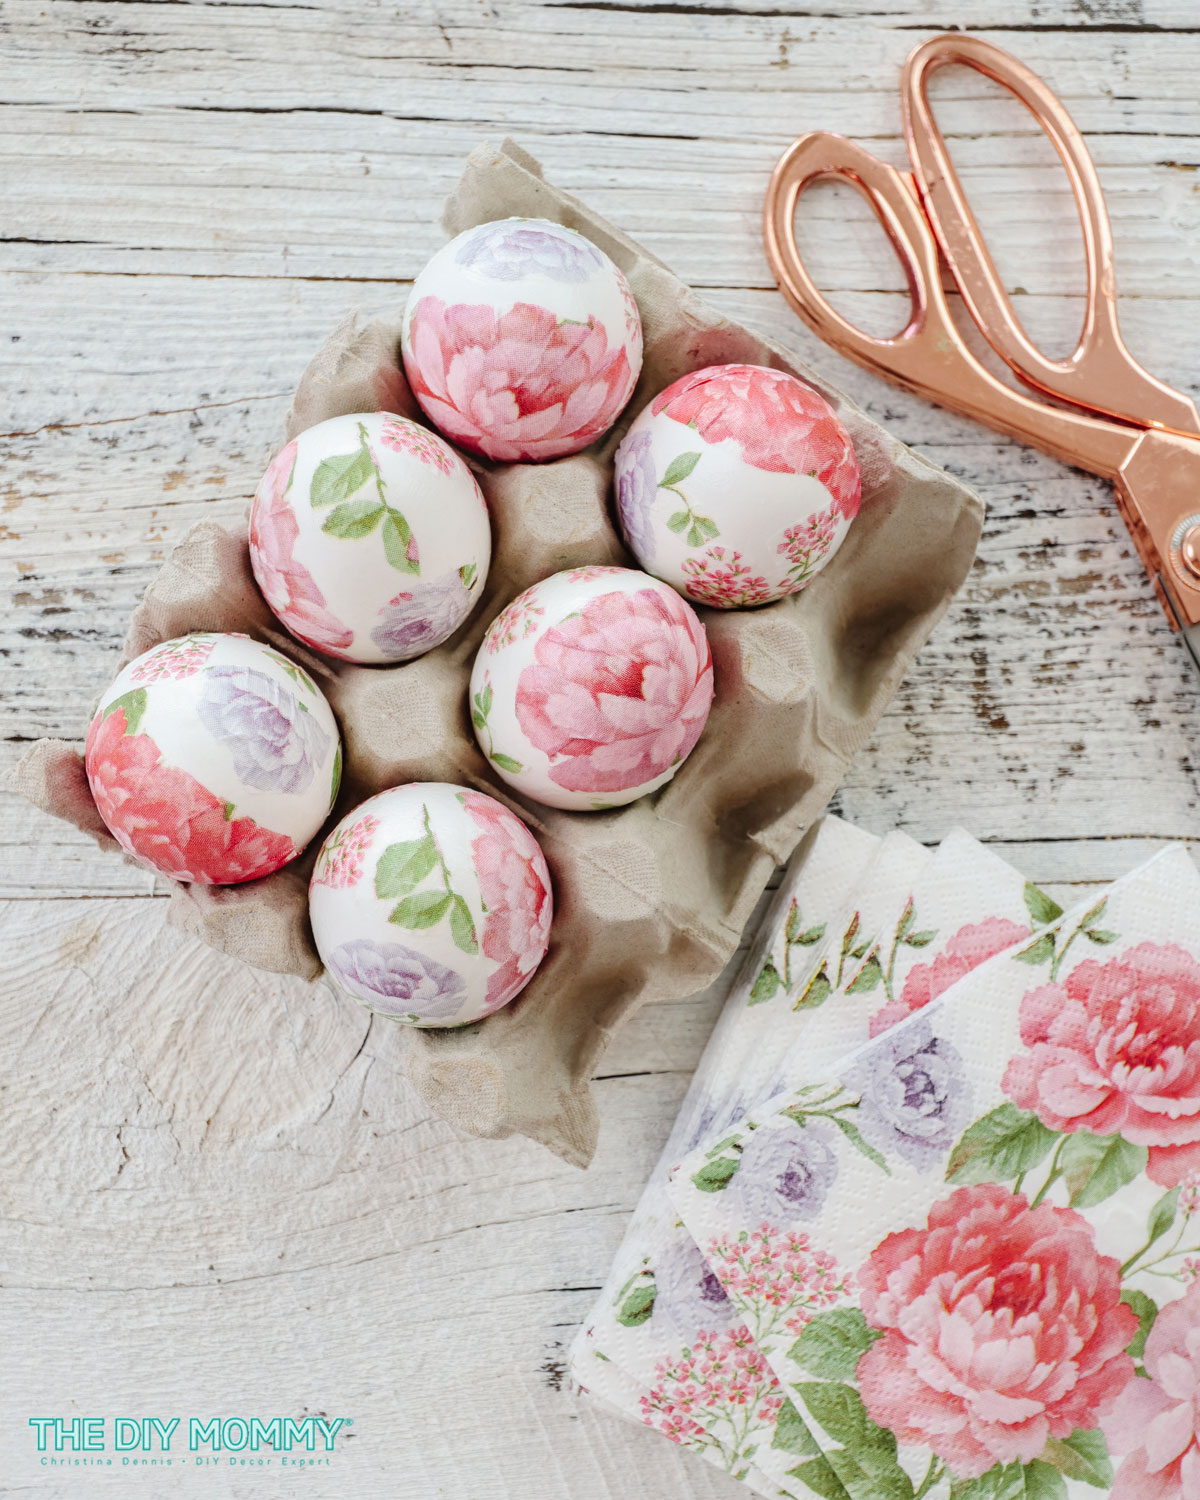
5. Easter Egg Decoupage
Transform plain plastic eggs into gorgeous custom decorations using napkin decoupage—a perfect spring craft for Easter.
Materials needed:
- Plastic eggs (or real blown-out eggs)
- Spring-themed napkins
- Mod Podge or watered-down white glue
- Small paintbrush
The secret is separating the napkin to its thinnest layer before applying it to the egg with Mod Podge. The result is eggs that look hand-painted and coordinate perfectly with your home’s color scheme. This is such a fun craft to do with kids, too! You can find my full tutorial for these gorgeous floral napkin Easter eggs right here!

6. Decorated Toilet Paper Rolls
Sometimes it’s the smallest details that make the biggest impression! This spring craft idea transforms an everyday necessity into a thoughtful design element.
Materials needed:
- Toilet paper rolls
- Spring-themed napkins
Ensure your napkin is large enough to wrap around toilet paper rolls, then place the roll on top of the napkin (wrong side up). Roll the napkin around the toilet paper, then stuff the two ends inside the holes of the toilet paper roll. It’s these little details that make your home feel more welcoming this spring season.

7. DIY Air Dry Clay Flower Frogs
This clever spring craft creates beautiful flower frogs using air dry clay and napkin decoupage—perfect for creating stunning spring flower arrangements.
Materials needed:
- Air dry clay
- Rolling pin
- Large round cookie cutter, big enough to fit over a mason jar opening
- Straws or small cutters for making holes
- Spring-themed napkins
- Mod Podge
- Paintbrush
Roll out clay and cut circles that fit over a mason jar opening, then use straws to create holes for flower stems. After the clay dries, decorate with napkin designs by using only the top printed layer of the napkins. Cut out your favourite motifs and apply them to the flower frog with Mod Podge. You’ll need to re-poke the holes with a straw. Finally, seal the design with more Mod Podge, and let dry. These custom flower frogs make arranging flowers easier and look gorgeous sitting atop a mason jar!
Tip: You could also make gorgeous DIY coasters using a similar method! Simply follow all the steps, but leave out the part where you cut small holes in the larger hole.

8. Decoupage Plant Pots
This Spring craft idea takes boring terracotta pots and transforms them into custom decoupage flower pots that look designer-made. You could also use this same method to transform an old vase!
Materials needed:
- Terracotta plant pots
- White acrylic paint
- Spring-themed napkins (or you could use some pretty scrap fabric!)
- Mod Podge or decoupage medium
- Brushes
- Optional: outdoor sealer if using outside
Start with a quick coat of white paint, then apply napkin designs with Mod Podge around the pot, working carefully around curves. Seal the finished piece with more Mod Podge (or outdoor sealer if you’re using the pots outside). These transformed pots would cost $15-25 each at home decor stores but cost just a couple dollars to make!
Pair these with some pretty Spring flowers for a gorgeous and thoughtful gift this season!

9. Napkin Paper Bowl
This spring craft creates a beautiful decorative bowl using nothing but napkins and Mod Podge.
Materials needed:
- Decorative paper napkins
- Mason jar
Open up a square paper napkin, then turn it so that the wrong side is up. Fold each corner to the center of the napkin, and then repeat by folding the corners to the center again. Flip the napkin over, and fold the corners to the center one last time.
Flip the napkin over again, and lay it on top of a mason jar. Gently pull the napkin corners down over the jar to create an inverted bowl shape. Remove the napkin bowl, and you’re all done! This is such a cute addition to a Spring party or Easter table, or to simply hold your Mini Eggs this season for snacking!

10. Spring Napkin Wreath
Our final Spring craft idea creates a beautiful wreath using paper napkins: simple yet absolutely stunning! Spring wreaths are a wonderful way to add a touch of the season to your decor.
Materials needed:
- Spring-themed paper napkins
- Wreath form (hoop)
- Hot glue gun and glue sticks
- Scissors
- Optional: ribbon for hanging
Separate the napkin layers, cut each into quarters, pinch the center, and fold to create a pouf. Attach these poufs around your wreath form for a lush, textured wreath that looks boutique-bought but costs under $10. I love using blue & white napkins for this wreath to create a classic Spring or Summer look!
Why These Spring Craft Ideas Work So Well
What I love most about these napkin projects is how accessible they are for anyone. You don’t need special skills or expensive supplies – just some pretty napkins, basic craft materials, and a little creativity.
These Spring craft ideas allow you to completely customize your seasonal decor to match your home’s color scheme and style. By choosing napkins in colors and patterns you love, you create cohesive, personalized pieces that look thoughtfully curated!
Most importantly, these projects deliver big impact without the big price tag. Your home can look full of Spring cheer and style for just a few dollars!
Ready to Try These Spring Craft Ideas?
Which of these simple ideas using paper napkins will you try first? I’d love to see your creations if you give any of these fun spring crafts a try! Tag me on social media @thediymommy or leave a comment below with your results.
Remember, beautiful Spring home decor doesn’t have to break the bank… sometimes the most gorgeous items start with a simple paper napkin!
Disclaimer: These projects are shared from my personal experience, and results may vary. Please attempt all DIY projects at your own risk. Be careful when using tools like hot glue guns and irons. Always work in a well-ventilated area when using Mod Podge or other adhesives.


